We all know in Energy that we spend countless hours sending information back and forth between our team members, as well as our service providers and customers. Whether that is between two wholesale trading counterparties, or between an energy retailer and energy customer.
At Utilidex we wanted to make this part of your life a lot easier. That’s why we called the product the Hub, and set upon a journey to make sure important information could be accessed by those that needed it.
But we also know that security and user management are critical. It is important to make sure only those that have the right security and permissions can access the data. And most importantly you have control.
Manage Roles
Firstly, the Hub uses Role Based security, in that every user must be assigned to a role. The roles available depend on what you are using the Hub for. For instance, if you are an energy trader, you may have roles for trading, and if you are operating as a consumer, you may have roles for your internal teams, as well as your service providers. Before setting up new users, make sure you are happy with the roles you have available.
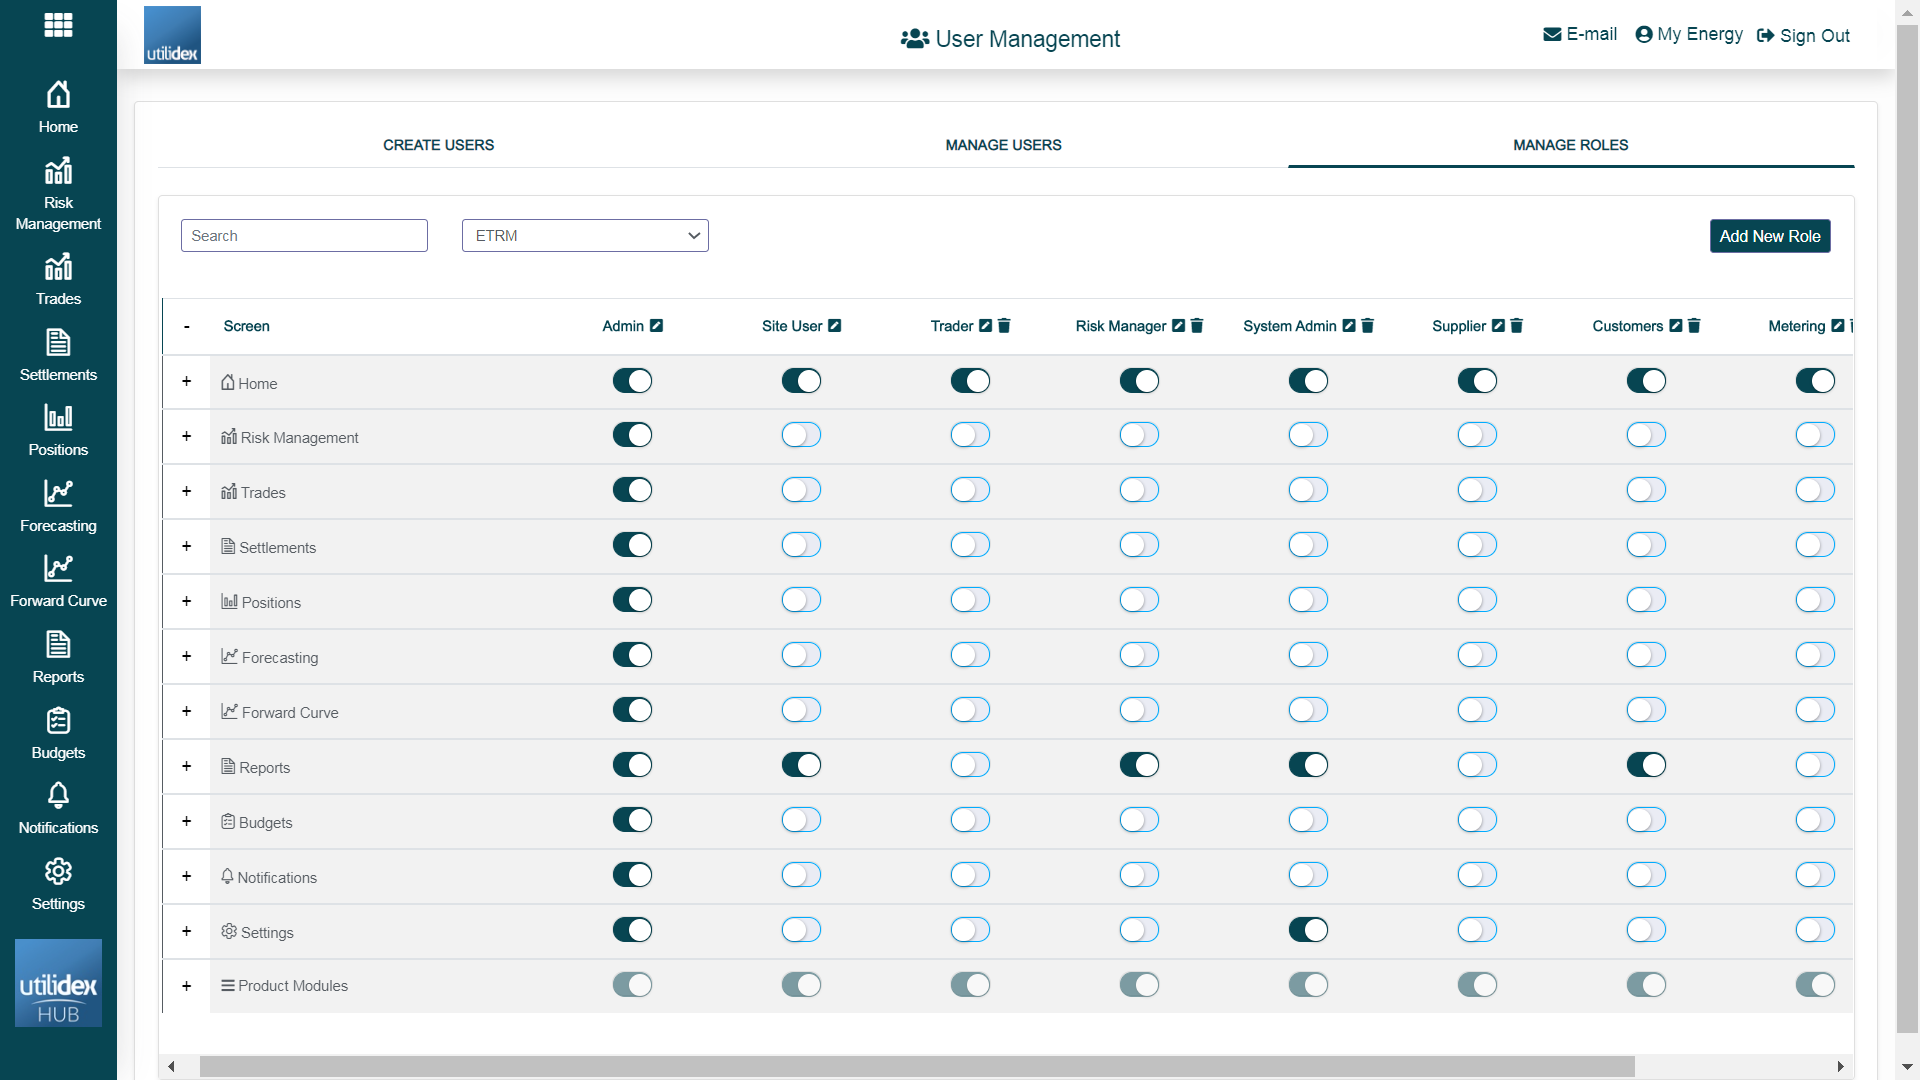
You can see what roles are available with your subscription in the following screen. You will note that some roles have access to certain screens and others do not.
Navigate to this screen through Settings >> User Management >> Manage Roles.
Module User Management
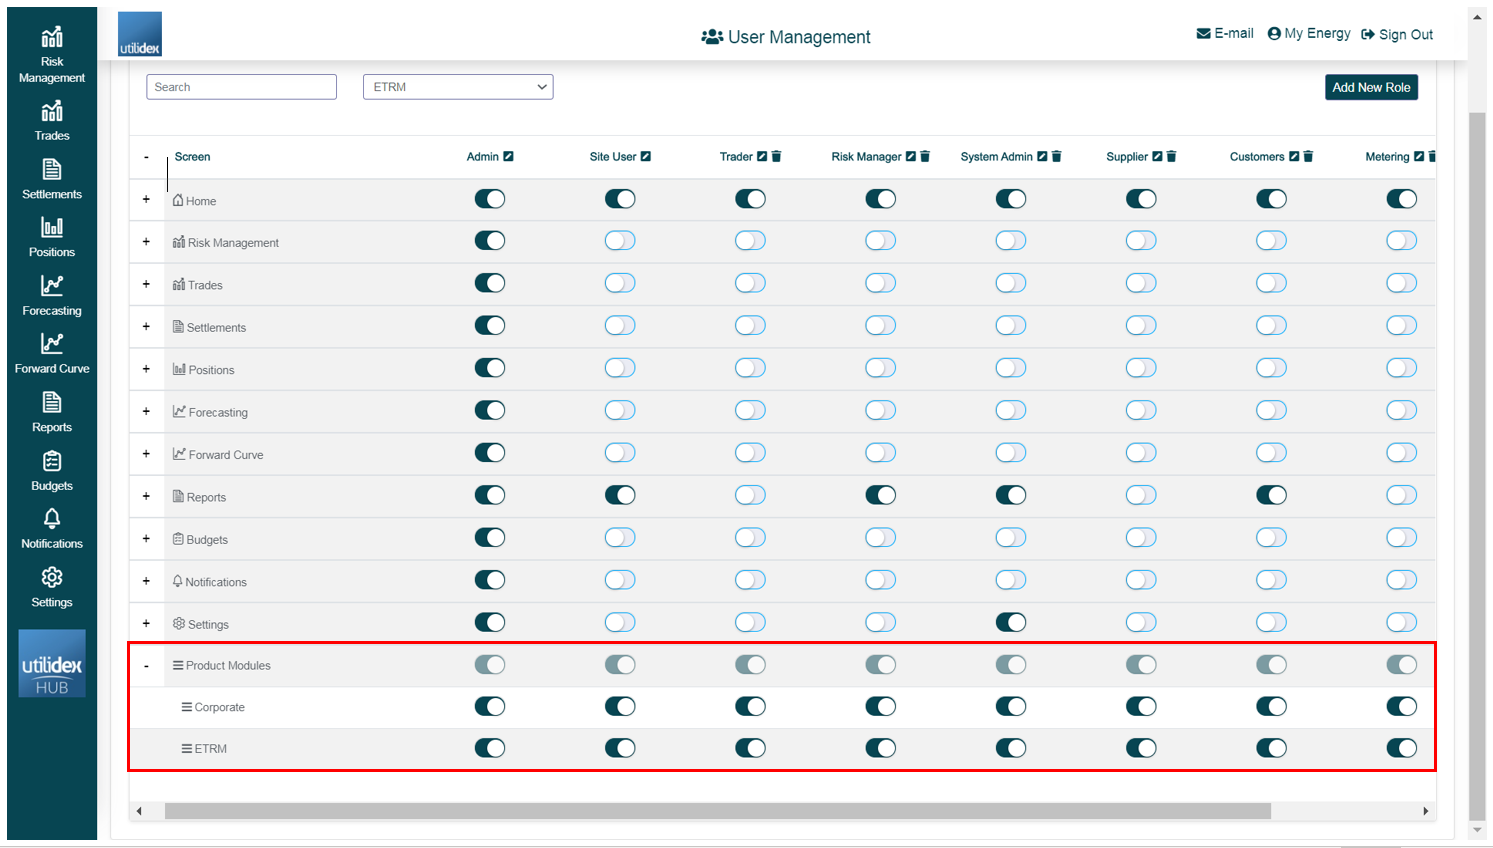
Customers that are subscribed to more than one module (Data Platform & Bill Validation, Analytics, Procurement), can now decide to assign each of these to different user roles. As you can see from the image below, under Product Modules in Manage Roles, you can choose to activate or deactivate the Corporate or ETRM modules depending on the type of user and the permissions you would like them to have.
BIs User Management
Admin Users can now decided which BIs their customers have access to. In this way you can manage your customer roles and decided to create a Customer Plus role with access to all of the BIs and a Regular Customer, with access to only some of them.
In order to assign different BIs permissions to different customers, navigate to Settings >> User Management >> Expand Home.
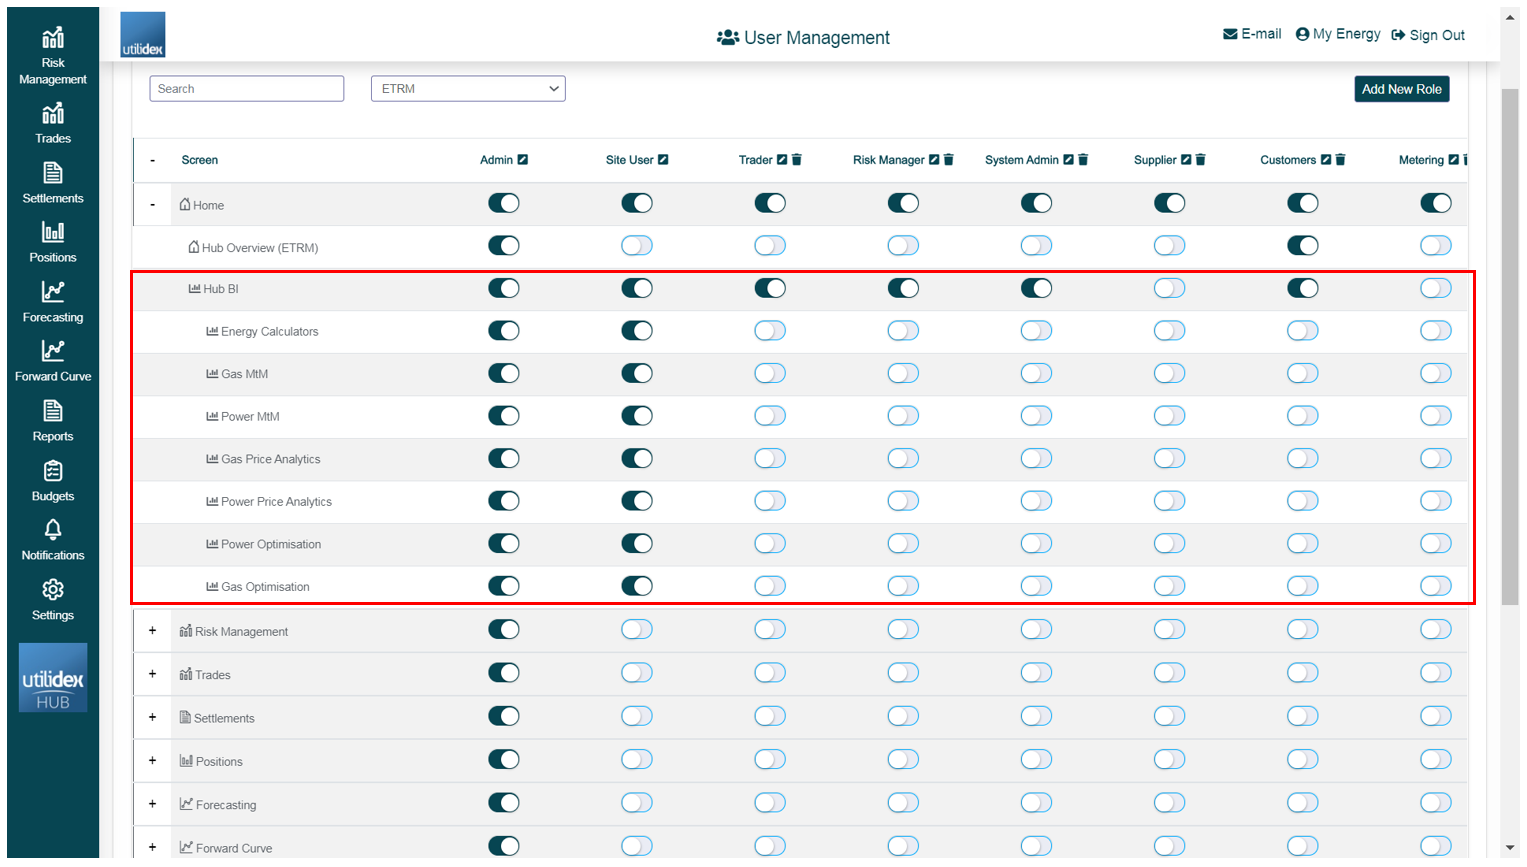
Please Note: Once you have changed the user permissions for different BIs, the BI will refresh and it may not be available for a maximum of 30 minutes. This is due to our security checks, we want to make sure all the customers have only access to the data for which their permissions are configured.
Create Users
Once you are happy with the roles that you have and what access privileges they have, you can commence setting up users. We’d recommend that you have 1-2 admin roles within your organisations, as these will be the people, who can set-up new users in the future and control your company’s subscriptions.
The Energy.Hub uses Microsoft’s Active directory for password and user access, this provides a secure methodology in which your Username will be your email address, and passwords set by each user upon logging into the system for the first time.
Create Single User
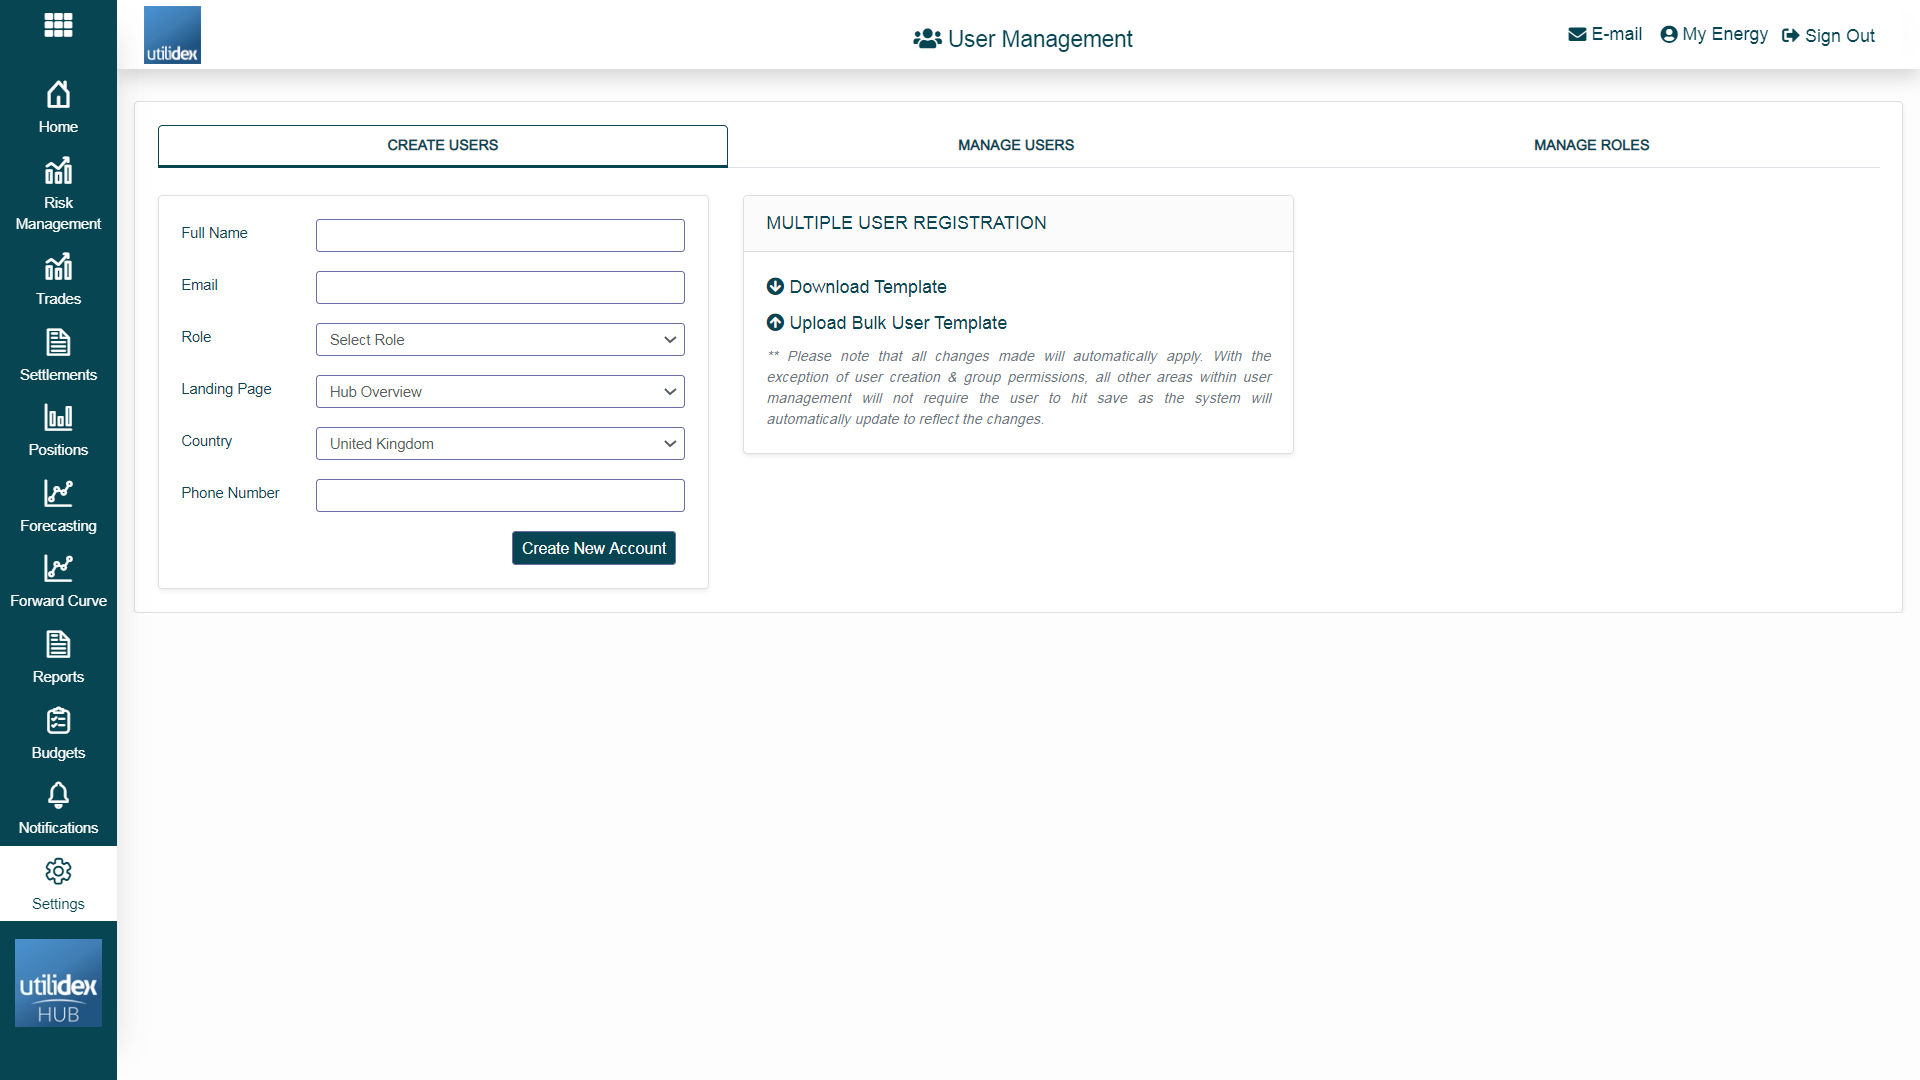
In order to set-up a new user, simply go to the screen below and enter the user’s details, and assign them to a role.
Navigate to this screen through Settings >> User Management >> Create Users.
Multiple User Creation
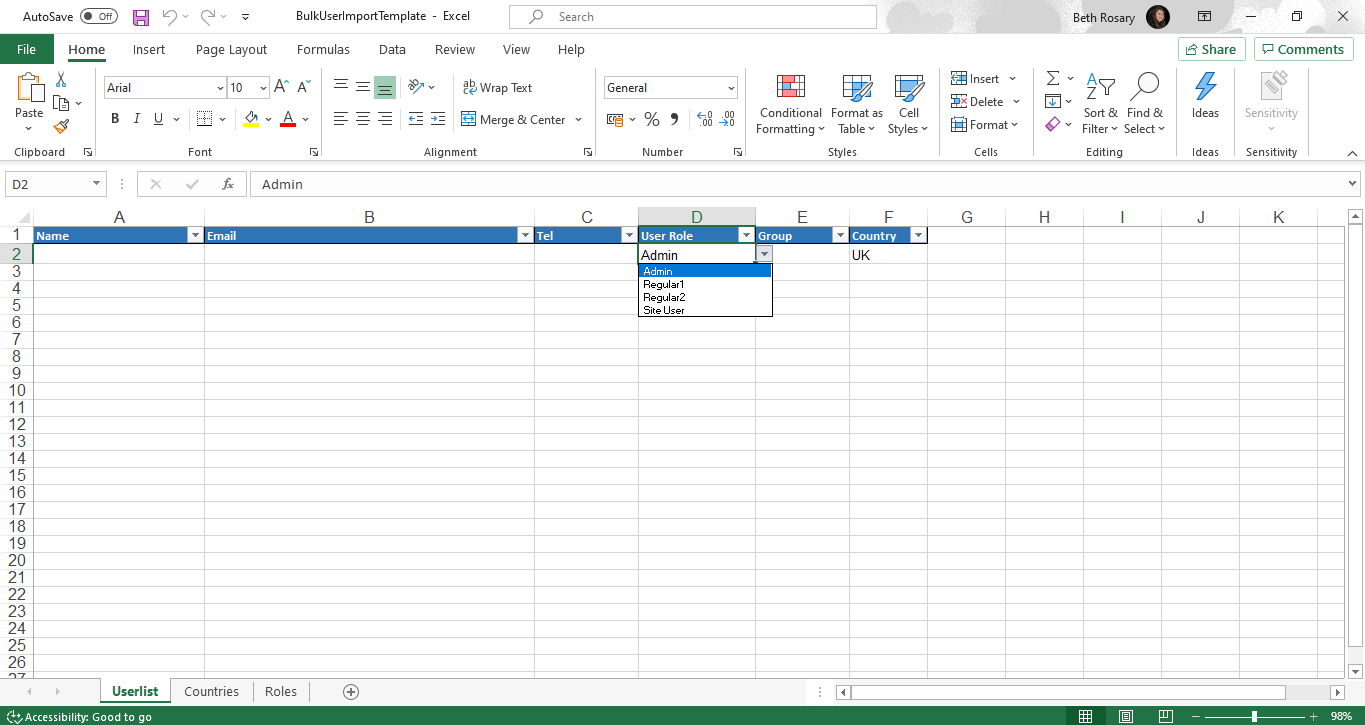
You have the possibility to upload New Users in Bulk. You can do so by downloading the template under Upload Multiple Users, populating it with the required information, and re-uploading it to the system through Upload Bulk User Template. Please be aware that the User Roles drop-down in the bulk upload template shown below are just for reference purpose.
Manage Users
Once your users are set-up. They will then appear in the “Manage Users” section.
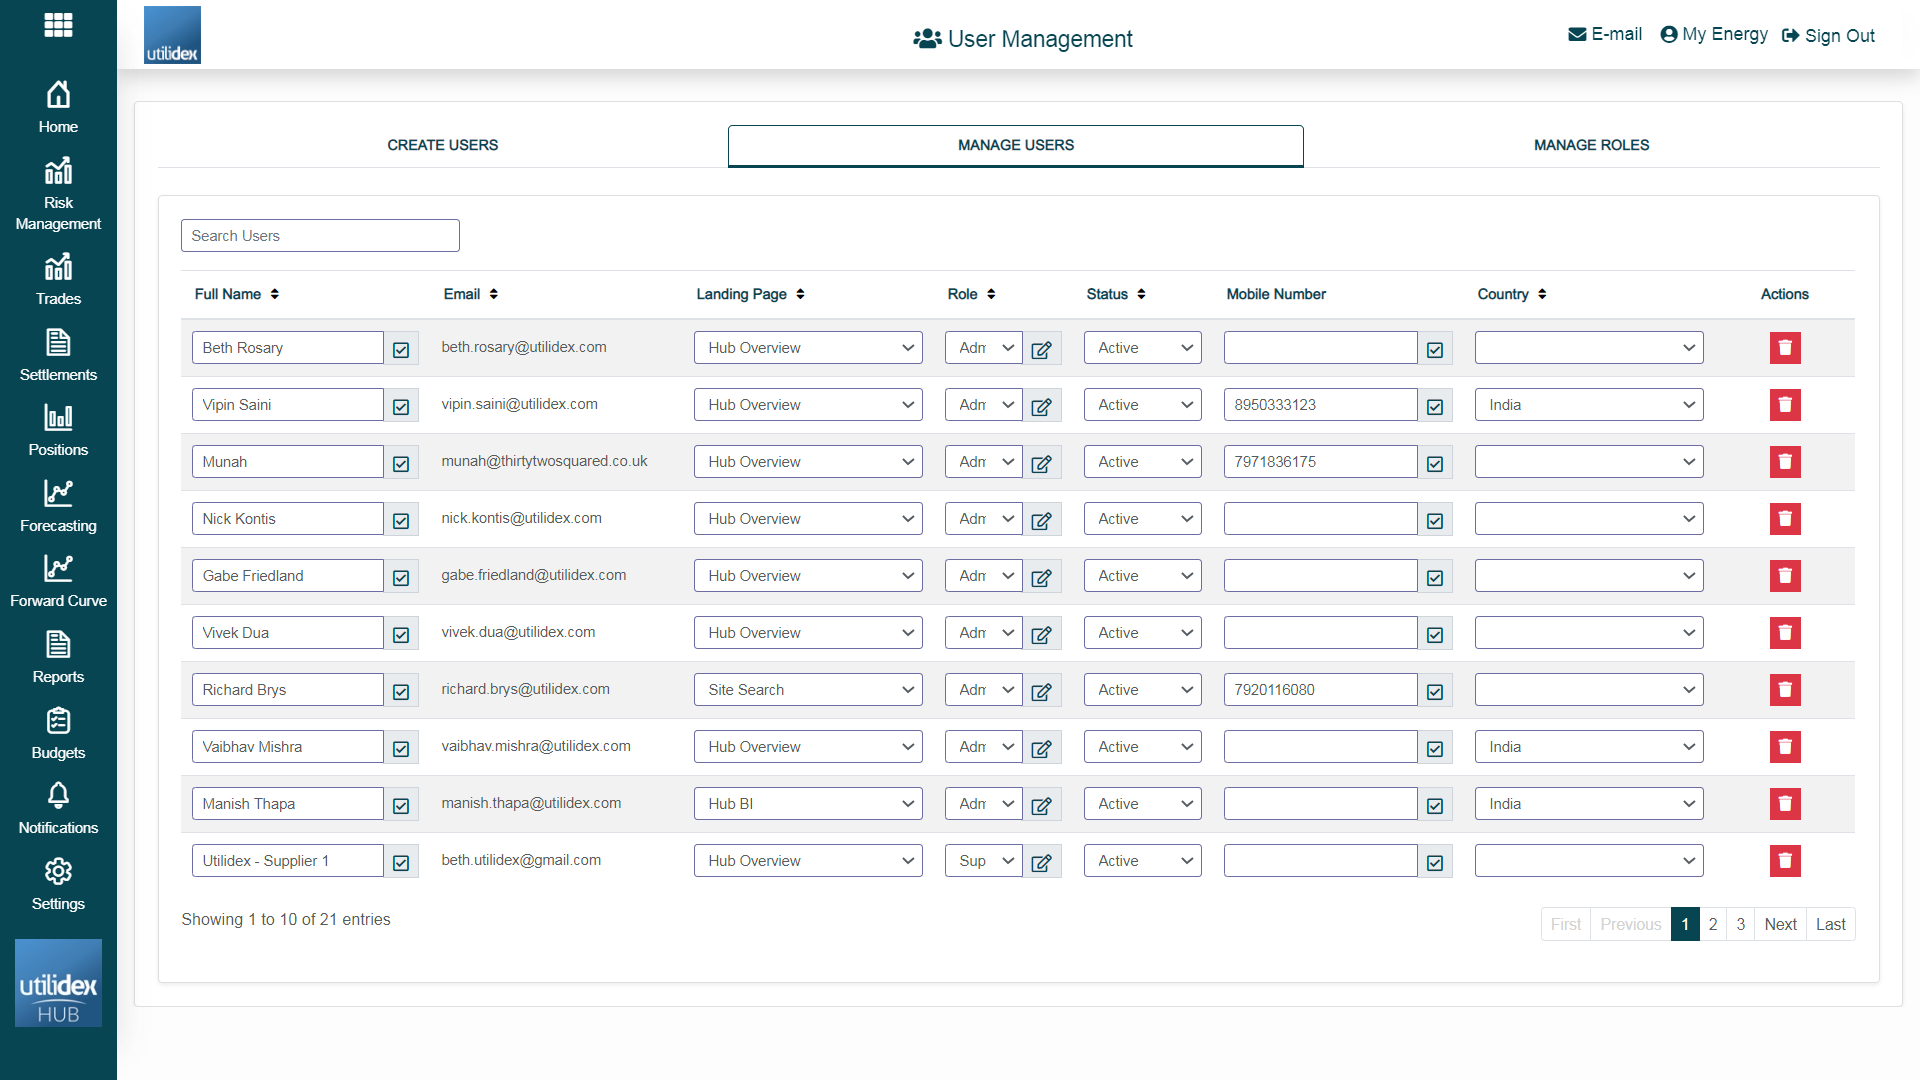
Below is the list of functionality within this screen:
- You can edit and assign users to a user role
- You can sort the users ascending or descending
- Admin users can delete users by selection on the delete under actions
- Define the landing screen for the user under Default Page
- Under Status: You can Activated or deactivate the user
- You can add the user to different groups that were created in the My Company settings,
- If you click the pencil icon between Type and Status , you can set fine grained permissions. This gives the user access to the data within the Groups dependent on their user role type.
- Ensure to select save to save any changes
Special access – Groups
When you have Groups activated in your product. You can effectively group sites together. For instance, if we assume you had a portfolio of 50 sites and within those 50, 20 were “Corporate”, 20 were “Small Offices” and 10 were “Stores”. This can also work if you serve multiple customers, as the group will then be the customer name. It might be also that you have a different set of people that manage these areas. Maybe they have different energy managers, or different line managers.
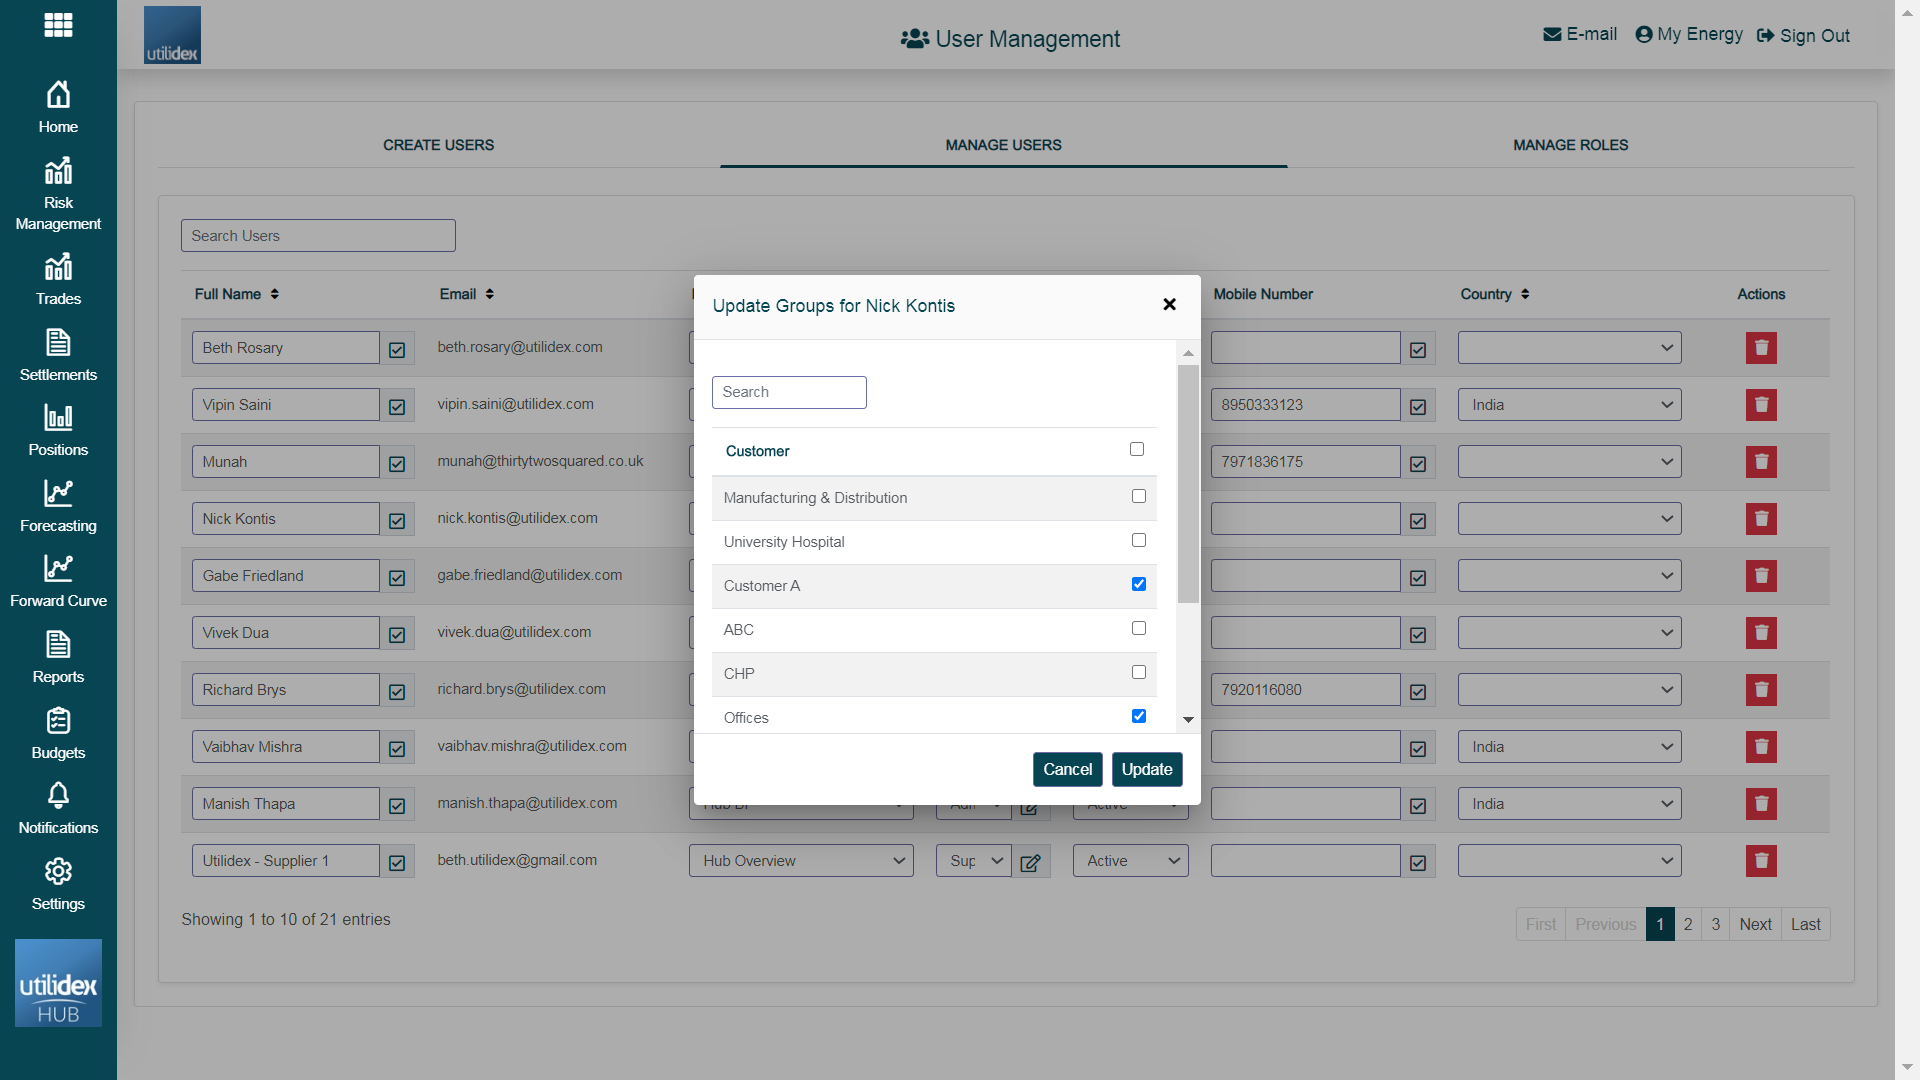
Once groups have been set-up you are able to assign users to the “Groups” role and then you can click on the pencil icon and select which groups of sites that user can have access to. Navigate to Settings >> Manage Users >> Click on the pencil on the left side of each role in the Role column.
The screen below gives an example of what you should see:
By then checking on the Manage Roles tab, you can double check what screens they can have access to.
Groups is a very useful set-up for the following key items:
- Where you wish to split the management of your portfolio into different sections, and grant access to the appropriate personnel in your team.
- If you are a supplier/service provider and you wish to group sites by Customer and then grant access to certain screens/data items to your end customers*
Important:-Please note that where you are granting access to an external party, they will need to agree to a EULA (End User License Agreement) – for more details on Licensing and EULA – please check our website here.
Special Access – Suppliers and Metering
If you are a corporate/service provider you can also grant access to your supplier and metering company. You do this by creating a new user and assigning them to the role of either Supplier or Metering.
You will then need to click on the pencil icon, and select which metering or supply company they belong to.
Again, by clicking on the Manage Roles tab, you can see what screens the Metering Company & Supplier can see. The Hub will only show the data that is relevant to those parties and it uses the Site Services Standing data, to determine which sites are with which Provider.
Important: – it’s really important to maintain accurate standing data. So that the supplier and metering company is correctly selected. If you have incorrect allocations, this could result in your metering company, or supply company accessing incorrect records.
Multi-factor authentication
Most secure systems these days, include the option for multi-factor authentication. In some cases, such as in banking services, the standard is enforced. In short, this is another way to identify you as a user of the system, over and above the standard username and password. At initial configuration, users can define their preference which will be applied system wide.